By: Chris Brinson
Link to this page:
Fiberglass Sub Enclosure
By: Chris Brinson
![]()
Link to this page:
When I decided that I wanted to upgrade my car audio system, I came up with a number of requirements and then designed the system around those requirements.
* The first requirement was absolute stealth. I wanted people to get in the
car and have absolutely no idea that there was a high quality system in the
car.
* Secondly, the car had to retain a useable trunk as it is currently my only
car and I enjoy periodically taking road trips.
* The system had to be capable of being gradually built up to compete in the
IASCA novice division for sound quality. This requirement was not as important
as the first two, but still a consideration.
The solution in a word was: fiberglass. Fiberglass can be molded to any shape, is more rigid than wood and is lighter than the types of wood used to build sub boxes. It is an excellent solution for building amp racks and enclosures in cars except for the following slight problems:
* A. It is perhaps the messiest, stickiest mixture of materials on earth.
* B. It gives off noxious fumes while curing.
* C. It will get all over any unprotected surface of your car and you will never
get it off. (see A)
* D. It is not only harmful to inhale the fumes while it is curing but very
bad for your health to inhale the dust while sanding.
* E. Fiberglass dust is miserably irritating to your skin.
* F. If you do not measure correctly when laying fiberglass you will quickly
make nothing but a mess.
That being said, let me tell you more about the project. After a good deal of researching old car audio magazines I decided to model my sub enclosures after perhaps the most legendary competition car audio vehicle; Richard Clark’s Buick Grand National. This car was simply amazing and one of the neatest things about it was that all of the car’s speakers were located in the cabin of the car. In my opinion, there is only one good reason to put subs in the trunk; they don’t fit anywhere else. The trunk gives off a great deal of sympathetic resonance, is prone to road noise and since the bass must be channeled into the car, this road noise usually raises the vehicle’s overall noise floor.
My solution was to build enclosures in the fenders, with the speakers firing from behind the quarterpanels on either side of the back seat. Thus, I would retain the use of my trunk, the car would appear stock and I would be able to isolate the cabin of the car from the noisy trunk.
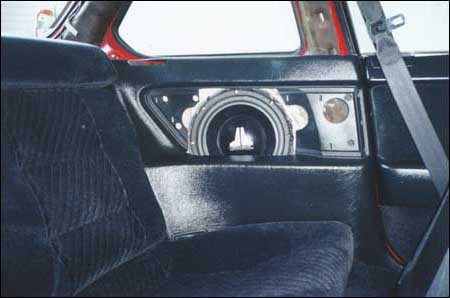
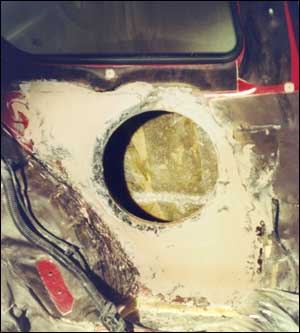
This first picture is about how the area behind my quarter panel looked before I began cutting out the extra sheet metal and rear seatbelts from the inner fender area. (This is actually a picture of site member prelusion’s car.)
First, I removed the majority of the interior of the car and covered the dash with plastic sheeting. Next, I cut out the rear seatbelt supports and extra sheet metal. The proper tools for cutting sheet metal and the seat belt supports would be an air tool like an air nibbler. I did not have one, so I used a Dremel with fiberglass reinforced cutoff wheels. I wore safety glasses at all times. Seriously. If you try something like this, wear safety glasses!!
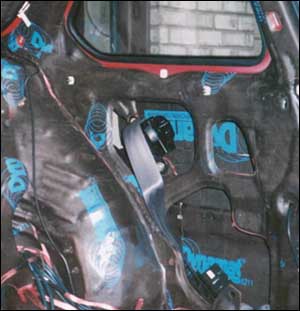
Dynamat was then applied to every square inch of the inner fender well. I created a mold for the enclosure using the dynamat. If you were to peer into the fender well, you would see a tublike enclosure. The dynamat was laid in such a way that any harsh corners were made more smooth so that fiberglass mat could be easily laid up on this surface.
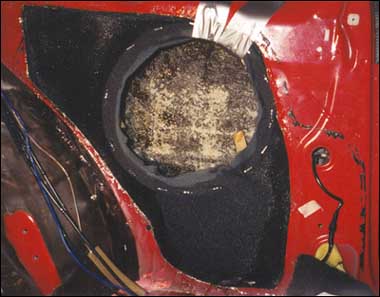
The next step was to begin laying the fiberglass mat and resin directly on the dynamat. No, this is definitely not an enclosure that can be easily removed! Laying fiberglass in such a small and contorted area as a fender presents numerous challenges. I will not go into the process of mixing resin and catalyst and laying up fiberglass. The process of working with fiberglass deserves at least its own article.
Next, I constructed the front of the enclosure. To build the front, I first cut a trim ring for the sub out of Medium Density Fiberboard (MDF). I used a jigsaw to cut a ring with an inside diameter equal to the mounting diameter of my sub and outside diameter about two inches larger than the mounting diameter (an inch thick ring).
Now, I took a large piece of speaker grill cloth, laid it on top of the trim ring and stapled it to the trim ring. I then cut a large circle out of the grill cloth in the center of the trim ring. And now for the hard part. I stapled the edges of the grill cloth to the front edges of the speaker enclosure. This was nearly impossible as fiberglass is very hard and thus difficult to staple. Not to mention that there is not much room in the enclosure to manipulate the staple gun. After the ring and cloth were attached to the enclosure, I used scraps of wood to stretch the ring and cloth into the position I desired. This is difficult to describe, but basically I cut a few small scraps of wood to the correct size so that they could be used to push the trim ring outward from the enclosure.
Next, I used my brush to apply the resin/catalyst mixture to the speaker grill cloth. After the cloth hardened, I began laying up my fiberglass mat on the grill cloth. Once the several layers of fiberglass cured, I sanded the outside of the enclosure and applied a thin layer of bondo. I also had to lay strips of fiberglass and resin on the inside of the enclosure where the face of the enclosure meets the enclosure itself.
Now, I drilled a small hole in the enclosure for the speaker wire, ran the wire, and siliconed the hole around the wire from inside and outside the enclosure. I then placed the speaker in the enclosure and marked the screw holes. I took the speaker out of the enclosure and drilled small pilot holes for the screws. Next, I layed a thick bead of silicon around the edge of the mounting ring. I connected the speaker wires and secured the sub to the enclosure.
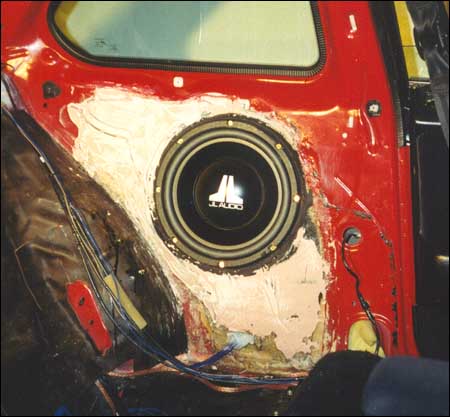
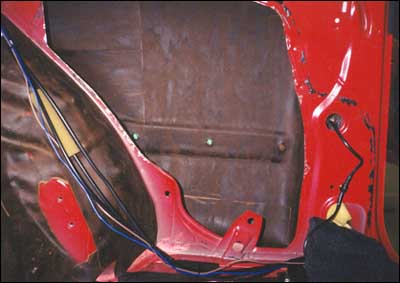
I have not yet completed the install. The quarter panel required slight modification to fit over top of the speaker. So far, I have test fitted one of the panels. The interior of the car will be completely recovered in leather. The holes where the seatbelts used to be will be fiberglassed and the entire panel covered in leather. In addition, I need to construct a grill for the panel and enhance the look of the area around the speaker, for those times when the grill is removed.