car doesn't work to well without it:
Auto To Manual Swap
By: Robie Davis
Link to this page:
BACK TO PRELUDE3G.COM HOME
Hi! My name is Robie Davis, and I am in the navy!!!
Well, first things first, I am a mechanic for the navy, and we like to know
what we are dealing with before we get into it, so just a little note about
the tranny swap my friend and I completed on the 15th of January 05, to help
others along the way
!!!!!!!!!!!!! NOTE!!!!! I RECOMEND THAT ANY ONE WHO READS THIS, STUDY IT
FIRST, AND THEN GET EVERYTHING TOGETHER, THEN HOOK IT UP!!!!
Okay, here we go..........
Parts list:
DONOR CAR: about $350
1 standard tranny w/starter
1 set of shift cable linkages
1 master cylinder
1 slave cylinder
1 lower clutch line
1 clutch pressure regulator
1 shifter pedestal
1 pedal set
1 standard tranny mount
1 shifter cable bracket
1 flywheel w/flywheel bolts!!!!
KEEP ALL HARDWARE; DO NOT THROW ANYTHING AWAY THAT GOES WITH THE ABOVE
COMPONENTS!!!!!
STORE BOUGHT ITEMS:
Clutch and pressure plate of your choice
4 long bolts with flat and lock washers from hardware store w/nuts.
6washers and 3 lock washers
1/4inchx5ft brake line
Tube bender
PLENTY OF PATIENCE!!!
First part, under the hood.......
REMOVE YOUR BATTERY, DON'T EVEN ASK WHY, THERE ARE ALOT OF FUN THINGS YOU
NEED TO DO IN THIS AREA!!!!
Remove cv axles or, in my case, both sides of the front suspension,
on the passengers side, your going to need to disconnect the torsion arm
from the strut yoke, and twist it 90 degrees away from the transmission,
this gives you room to get the auto off the engine. There is a half shaft
that is connected to the rear of the block of the engine, three bolts and
slide er out. Remove the transmission flywheel cover, and unbolt (10mm) the
torque converter from the flex plate, otherwise, your tranny won't come off.
now, under the hood...Remove all of your intake equipment, all that plastic
slows you down! Look for the shift solenoids mounted on the transmission
itself, there will be two wires that you will unplug, and two you will have
to snip off, because the overdrive solenoid is hardwired to the harness,
(wires are black and red). Disconnect the starter hot and signal leads.
Disconnect the auto transmissions ground cable. Here we go with the
transmission mount: take the auto transmission mount out, and throw it away,
you do not need this, unbolt the automatic transmission from the engine, and
the swing bracket coming off the firewall. (7-10 bolts)(17mm) Lower the auto
transmission slowly, as the speedometer cable has its own assembly on the
back of the tranny. Remove the bolt holding the speedometer assembly on the
tranny (10mm). You're going to have to pull hard on the speedometer assembly
to get it out, because it has bevel gears. Now slide the transmission
towards the passenger side fender, and let it down on a jack, and throw it
out, because we all know that granny shifters are for grannies!!!!
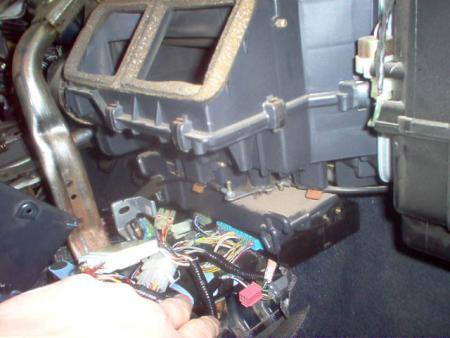
Second Part, Interior....
Now, assuming that you were able to get the 2 part pedal set from the donor
car intact, take the clutch defeat switch off the clutch pedal bracket, the
auto has a wiring harness under the dash, (which you will have to tear
apart), and the clutch defeat switch will not allow the pedals to slide in
to your car. Put in the pedal set, and bolt it down. First, put in the brake
and clutch side, then put in the gas. I'm assuming that you will not want
cruise control, but you can attach the cable to the cruise arm if you would
like to. Okay, her is where it gets tricky. Pullout your whole center
stack, I'm talking the whole enchilada, radio, coin tray, 8track player,
whatever, and set it aside. Unbolt the auto shifter plate from the body of
the car, and then proceed to get under the car... under the car, you will
need to unbolt the heat shield from the bottom of the body, and slide it
down and away from the auto shifter cable. There are four (10mm) bolts
holding it in and two holding the cable plate. You will need to undo the
cable from the auto tranny and slide it out of the tranny itself. Get back
in the car, and rip the auto shifter assembly out of there!
Third part, manual tranny prep and install...
Prepping for the manual transmission is easy if you have all the parts on
the parts list First up, put in the manual transmissions flywheel, and
torque the nuts to specified value, second, install pressure plate and
clutch disk, use clutch alignment tool to center the clutch disk in the
pressure plate, torque pressure plate bolts to specified value. Install the
transmission. We used two jacks, one for the front of the tranny, and one
for the rear. Don't forget to install the speedometer unit, and get those
hoses on the unit tight, or they will leak!! There will be some scraping on
the pressure plate by the input shaft of the transmission, but its okay,
there is no safe way seeing as how everything is within 2 inches of
everything else under the hood of this vehicle! Okay, now use the manual
transmission mounting bolts from the donor vehicle, this is important to do,
because the tranny hole depths do differ between the two transmissions. Bolt
up your swing brace, put in the manual transmissions mount. You will have to
drill out the mounting holes in the sub frame next to the autos mounting
holes. Put drill all the way through the sub frame and fender wall. Make
sure you make the bolts tight; this mount also supports your engine! Put in
the half shaft that goes on the back of the engine, and reassemble the
driveline. Yes, the half shafts are the same!!!
Now we are done installing the actual transmission side.
Okay, quick recap... we have one 3rd gen lude with a manual tranny
under the hood, and yet we still have to install all of the goodies to make
it work. We need to install A) shift cables and holders B) clutch lower line
and custom made upper line C) shifter assembly to the body
A) Shift cables I admit defeat on this one- the standard shift lude has an
opening behind the engine that Honda originally routed the shift cables
through. I could not use this opening, because I am obviously not talented
enough to tame these cable linkages, but anyway- I used the opening for the
auto shifters cable. So, install the shifter pedestal onto the body with the
four bolts and pillow pads from the donor car, have someone pass the cables
through the auto cables hole. Insert the shifters cable sleeves into the
holes in the shifter pedestal uprights portion. Don't worry, you can't mess
that up. Tap the tabs onto the shifter sleeves, locking the cables into the
pedestal. Under the hood, you're going to have your assistant pass the
cables up to you from behind the engine. Put the cables in the tranny
bracket and tap down the tabs into the cable sleeve holder there are three
studs that this bracket mounts to, and surprise surprise, there is the
heater core return line right smack dab in the middle of it all, so your
cable needs to clear this line, so in order to achieve this, on all three
studs, place two flat washers each, and then one lock washer each, thereby
providing clearance for this line, you may also need to go and purchase
longer tubing to replace this line ( it sucks when that biotch breaks at the
burger joint, believe me!) tighten down the cable bracket, slide the cable
ends onto the transmission, and wa-la we have shifting! All right we'll get
down to a little fabricating now....
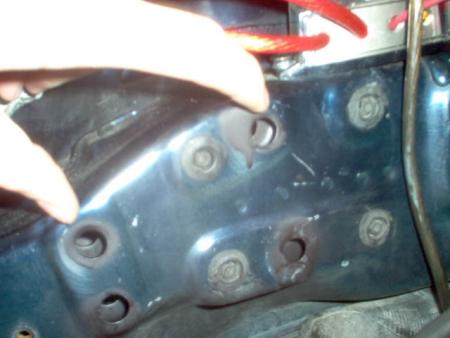
B) Clutch lower line will be from the standard car as well, and will run
right through the tight space between your battery and starter, be sure to
get the banjo fitting tight, as it holds quite a bit of hydraulic pressure!
Other people have claimed that they could install the Oem upper clutch line
from the standard car, if they ever showed that to me, I would buy them
lunch at the olive garden! That freakin thing just looked like trying to
install a damn accordion behind my engine, so I cut off the fittings and
threw that bitch away! My friend and I custom bent our own line from
1/4inx5ft brake line we got from the auto store. Remember to keep the
fittings from the standard cars lines! Four bends, and we were on our way to
bleeding the clutch, which you bleed just like your brakes.
THINGS THAT NEED TO BE CHANGED IN YOUR CAR, AND UNDER THE HOOD!!!!
1) Tranny mount
2) Lower radiator hose
3) Battery ground wire
4) Heater core return hose (oh yes it will rip off...)
5) Just thought I would throw this in: you will have to unbolt all of your
wiring harnesses from under your hood, and yes it will look like crap!!
6) You can convert your intake to short ram, just by buying a 3inch sewage
coupler from wall mart, and a k&N filter from auto zone, and yes, it will
sound mean!!!!
7) Yes! There is a tranny control switch connected to your granny shifter,
put this switch in neutral, and wire up your reverse lights to the reverse
wires inside the car. There is a reverse switch on top of the manual
transmission.
Well, maybe I went a little overboard, but I want people out there to know
its not just move the mount and you're done, heck no! It's a heck of a lot
more to it than that! So I hope this is as accurate for everyone as it
should have been for me, so I'll say so long, and back to the grind. Peace.
AS3 Davis USS BELLEAU WOOD signing off!!!!
Here's pics tsiah (Im a bad bad man!) posted in pp.com:
Here in the 91 Si you have the ICU...black box with blue plugs in it
car doesn't work to well without it:
If this were a 2.0 Si the AT control unit would sit in front of this unit
but since its a Si (b21a1) the ATCU is here:
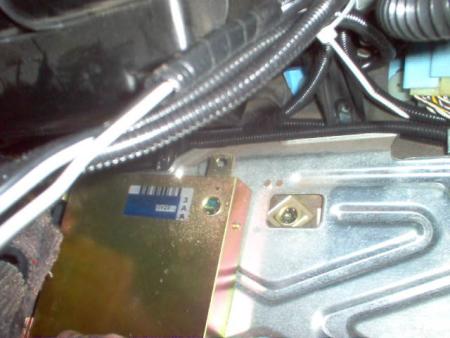
It normally sits under that metal plate next to the ECU:
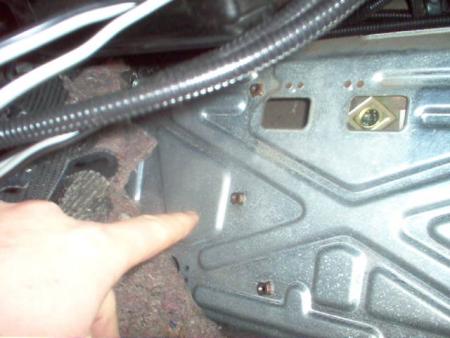
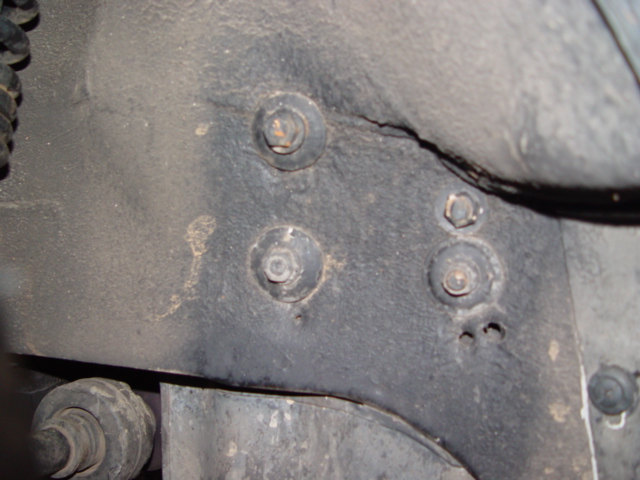
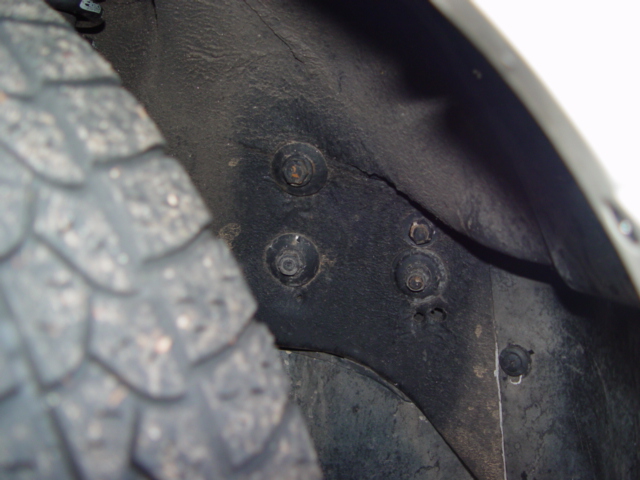
Transmission mount holes:
Here's where the AT mount goes...those black plugs were in the holes for the MT mount:

Here are the holes you will find once you take those black plugs out
you need to get a big drill and drill the hole all the way through, you then get some really long bolts and put them through the holes...put a nut on the other side:
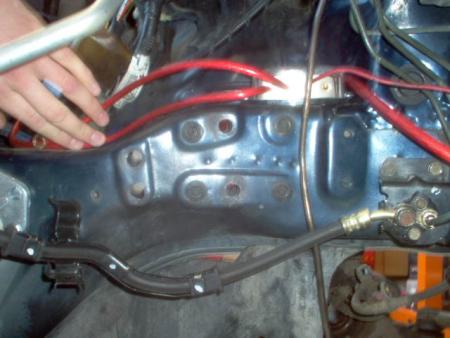
Here's pics of SiRxLaUgHs' tranny mount bolts sticking into the wheel well:
Older less detailed auto to manual swap:
By: Daily Interlude
(From: http://preludepower.com/forums/showthread.php?t=201690&page=1&pp=10)
For those searching on auto to manual swap info:
1. Remove auto tranny and it's mount, gas/brake pedal assembly, Auto trans control box in center console (toss it!), shifter and cables.
2. Wiring: There is a larger black with white stripe wiring that you'll need
to crimp together to start the car. There are black and pink wires which need
to be crimped together for cruise (you won't have clutch disable though...if
you want clutch disable, connect these wires to the ones on the clutch switch
attached to the pedal). Reverse lights...There is a pair of wires on the tranny
that need to be connected to the same colored wires from the auto trans control
box inside.
3. Install flywheel, clutch kit, tranny, manual tranny mount (need 4 long bolts
with nuts after you drill all the way through), brake/clutch pedal assembly,
gas pedal assembly (the full manual pedal assembly is 2 parts and both are needed),
shifter and cables, master cylinder, slave cylinder (and the pressure line that
connects them though you might want to mount this line first for ease of install).
4. You can swap out the gauge cluster though it's not necessary (that blinking S3 light can be annoying though!). Maybe find wiring colors in online manual and custom wire up something to the gear selector lights on the gauge cluster?)
I think that's it. Please add if you see the need.
Hope this helps someone!