Just Bought Car / Tune-up
By: MustardCat
Special thanks to: Car_boy_16, Dano, paranoidjack
Link to this page:
BACK TO PRELUDE3G.COM HOME
Ok, so you just bought your own 3g lude or you've had the car for a while and want to make sure its running at its full potential:
1. Compression Test:
Doing a compression test can tell you if the engine is healthy or not. Low compression in one or more of cylinders will cause a loss in power and they usually will burn oil.The piston rings, valve seats, or head gasket will be the most likely causes.
You need to get a hold of a compression testing gauge and proper threaded hose to go with it. The hose part will plug into the gauge on one end and screw into where the spark plugs do on the other end. You should be able to pick one up or even rent one at any parts store. You pull all the spark plug wires out of the head, remove the spark plugs, then screw the compression gauge into one of the cylinders. Get in the car and go to start it but just hold the key in the starting position till the engine cranks over 5-7 times. Go to the engine bay and read the gauge, now do this for the other cylinders.
Optimally you will have about 170 PSI in each cylinder, if your engine has high mileage you might have lower numbers like 150 - 160PSI in each cylinder. However what you don't want for example is 160PSI in cylinders 1,2, and 4 but 140 in cylinder 3. That would indicate cyl #3 has a problem more than just the usual wear that the others have gone through. The minimum you want in any or all the cylinders is 135PSI, if it's that low then it's time for a JDM engine or rebuild.
So what if you have a low number in a cylinder? Pour 2 teaspoons of 10w30 oil into the cylinder (though the spark plug hole) and then screw the compression test gauge in and re-test that cylinder. If the number goes up then your piston rings are to blame, if the number stays the same then it most likely has something to do with the valves.
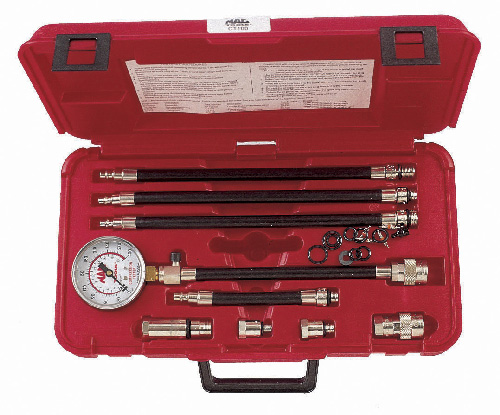
Here's a compression tester set made by MAC tools. This one costs about $140 but you wouldn't need a complete set like this if you just want to test your lude:
2. Timing Belt:
To start out you need to find out when the last time the timing belt and water pump was changed. This is very important on a Honda because we have interference engines. If the belt breaks your pistons are going to smash into the valves and it's going to cost a ton to fix, much more than it is going to cost to replace the belt now. You change the water pump at the same time because you have to take off all the same parts anyways and it's much easier to do them together. This is probably not a job for someone who hasn't done engine work before, and it might be better to leave it to a mechanic. However if your up to the challenge the procedure for changing it can be found in the online manual HERE
Also it's not possible to tell if the timing belt is still good by doing a visual inspection, you have to know the mileage. You can however check if it needs early replacement: soaked with oil, visual damage, etc.
Here's a picture of the timing belt side of the engine:

2. Basic Tune-Up:
Ok here's what many people over look when buying an older car. If the previous owner wasn't maintenance oriented then these parts may not have been replaced/changed for years, and replacing them can yield better gas mileage, more power, smoother idle, better response, etc.
The parts you're going to want to replace/change/inspect are:
Spark plugs
Spark plug wires
Distributor cap and rotor
Air filter
Oil change
Transmission oil fill / change
Check coolant
Check P/S fluid
Check clutch - brake - and ABS (If applicable) fluid level
O2 sensor(s) (Recommended but optional)
Fuel filter (Recommended but optional)
Spark plugs and wires:
Pull off the original wires, to remove the spark plugs you will need a ratchet with an extension, like 6" and a deep socket to fit them. They make special deep sockets with a rubber insert specifically for this and it would be a good idea to pick one up. Once you get them out you can inspect them:
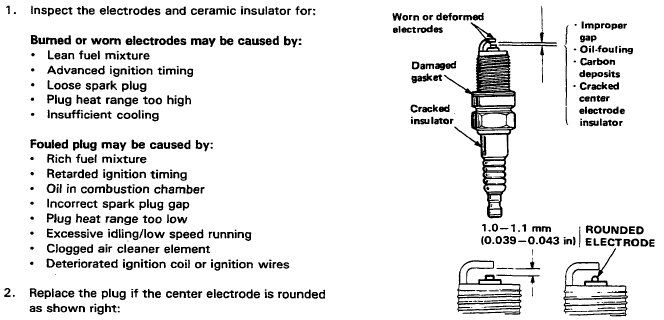
Check out THIS LINK and/or THIS LINK if you want more detailed info on reading sparkplug's.
Unless they look brand new I would replace them with new NGKs (Brand). When putting new plugs in don't forget to check and set the gap on them to between .039-.043in. You can get the tool to do this for a few bucks at an auto parts store. When you put them back in torque them to 13 ft-lbs. If you don't have a torque wrench (get one) run them down till they don't turn freely any more and give them another 1/4 to 5/8 turn.
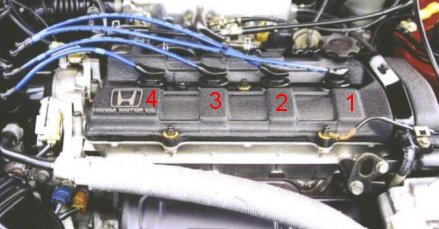
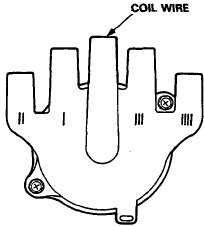
The wires are easy, you just put the new ones on like the old came off, and in case your wondering cylinder #1 is on the timing belt side. There are little marks on the distributor cap that show which cyl they go to:
Distributor cap and rotor:
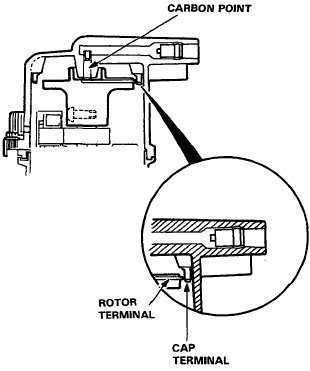
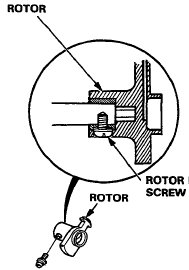
The distributor cap is the part that the spark plug wires plug into, it's held on with 2 phillips head screws. The rotor is inside and is held on by 1 phillips head screw. If you look at the inside of the cap you will see one contact point in the middle and 4 others at opposing ends.
Look at the contact points and check for wear or carbon build up, you can wipe out any carbon build up inside the cap and if the points aren't too bad take some 300-600 grit sand paper and just clean them up a bit. If they are worn down a ton just get a new cap.
For the rotor same thing pretty much. One side will have a metal strip, check it for build up and replace if needed. If you install a new rotor use some blue loctite on the screw because sometimes it will come loose, fall out, and cause the car to die. (Happened to a few people)
Here's some pics to illustrate:
Air filter:
Before buying a new one I would recommend taking the current one out and seeing how dirty it is. It's also not really worth doing this if you plan on getting a cold air intake soon, because they usually come with a new filter.
First remove the big tube going from the intake manifold to the air filter:
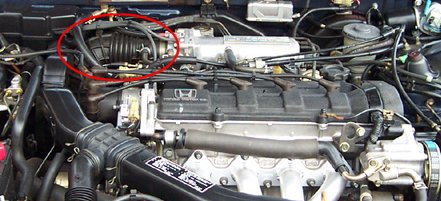
Next look down where the tube plugs into and take off the 3 bolts holding the air box cover on then you will be able to take the filter out, here the illustration:
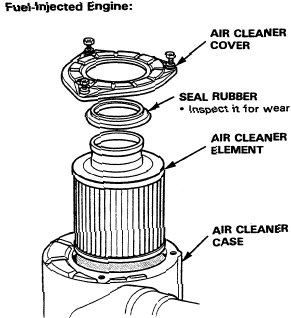
Once the filter is out just look at it and see if it's dirty looking or not, if it is replace it. Honda says to replace it every 2 years.
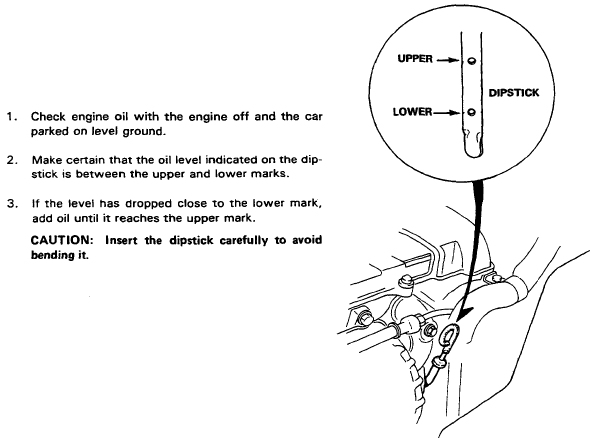
Checking Oil Level:
Engine off, remove the dipstick, wipe it off, reinsert and finally pull it back out again and check the level for an accurate reading. The marks on the dipstick represent one quart. So if the oil level is right at the bottom mark, pouring in 1 quart would bring it to the top mark.
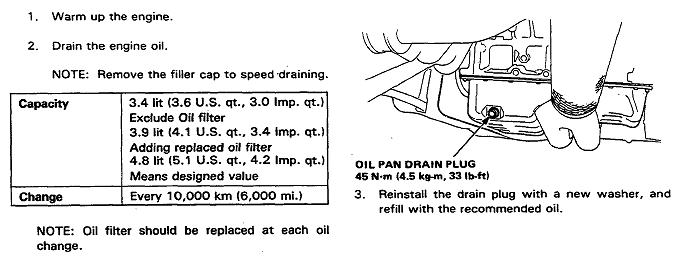
Oil Change:
Remember to change the oil every 3000-4000 miles to keep the engine healthy.
Jack the car up and support it with jack stands. (Never get under a car only held up with a jack!) Take out the oil pan drain bolt and drain the oil into an oil drain pan, then put the bolt back in. (Torque spec 33 lb-ft.) Also it's a good idea to replace the aluminum crush washer on the bolt whenever you can, you can get a new one at a Honda dealership or most auto parts stores.
Next unscrew the oil filter located on the back of the block, watch out because some oil will come out. Before you put the new filter on check that the gasket from the old one came off and isn't still stuck to the back of the block. Smear some of the oil you just drained onto the rubber seal on the new filter and screw it on. Once it stops turning freely I give it another half to full turn.
Now set the car back on the ground and fill it with oil, it takes about 4 - 4 1/2 quarts. Just pour 4 in and then keep pouring a little bit more in and checking the oil stick until it's at the top mark.
Let it idle for a minute then turn it off and then let it sit for another minute. Recheck the oil and fill as needed (Remember some of the oil you poured in at first has now filled the filter so you should be slightly low).
Transmission Oil Fill / Change:
Manual trans: Our manual transmissions don't have dipsticks so to check the oil you take out the fill bolt and the oil level should be right at the bottom of the threads for the bolt.(Check out the picture below for better explanation.) It's pretty hard to get to the fill bolt so you will need either some kind of hose that can reach down there or a funnel with a very long flexible neck. Make sure you have a way to fill the trans before you drain it!
I would recommend changing the oil completely if you don't know when it was done last, some people never change it because it's kind of a pain.
You can use 10w30 motor oil or Genuine Honda MTF in the trans. (Use the Honda MTF if possible, it shifts better with it.) Honda recommends replacing the washer on the drain bolt every time you take the bolt out, but to be honest it's not necessary unless the washer is damaged.
Also the car needs to be level when the transmission is filled, so get it up on 4 jack stands during filling.
![]()
Auto trans: Luckily the auto trans does have a dip stick so checking the fluid level is pretty easy. I'm just going to refer you to the picture below because it explains everything.
![]()
Check Coolant - Check P/S Fluid - Check Clutch - Brake - and ABS (If applicable) Fluid Level:
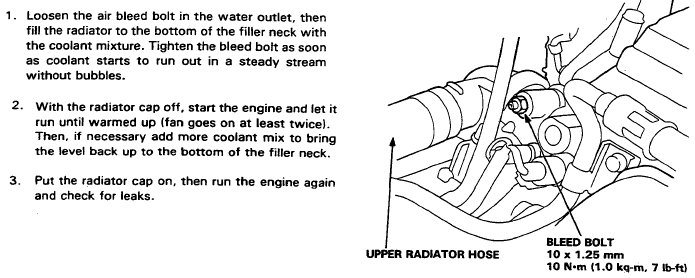
Coolant: When the car has had a fair amount of time to cool off, unscrew the radiator cap and look in there. ;-) If you cant see anything fill it up with antifreeze. The system is supposed to run half antifreeze and half water. If it's full but clear (Straight water) You need to locate the drain screw at the bottom of the radiator on the passenger side and drain 3.2 quarts (System holds 6.4 total) and refill with 100% antifreeze. Or just drain it all out and fill with 50/50 antifreeze mix. Once you have it full you will need to bleed it, again ripped from manual:
P/S fluid: At the front of the engine bay on the drivers side there's a reservoir with a little red cap. Look on the side of it there's a low and a high mark, fill it if it's under the low mark. Afterwards start the car and turn the steering wheel lock to lock a few times then add more fluid if needed. Only use Genuine Honda P/S fluid from the dealer!
Clutch/brake/ABS: The clutch and brake reservoirs are on the drivers side of the engine bay at the rear. For the brake its just like the P/S, fill it between the lines, for the clutch (smaller one) just make sure the fluid is up by the top and your ok. If you have ABS there will be another reservoir near the distributor. For fluid you may use glycol based (water absorbing) DOT3, DOT4, or DOT5.1 fluid. But stay away from silicone based DOT5, it's not better than 3/4 and it will ruin the hydraulic seals in the systems.
O2 Sensors:
Probably one of the more overlooked tune-up items....
The O2 sensor(s) read the air/fuel mixture of the exhaust gases and the PGM-FI system will alter the amount of fuel each cylinder is getting to keep the car at the optimal air/fuel ratio. Well when the sensors get old they will develop slower response times, inaccurate readings, and eventually not work at all. What's all this mean to you? Bad gas mileage, car may idle like shit, possible loss of power/ bad acceleration, and eventually catalytic converter failure.
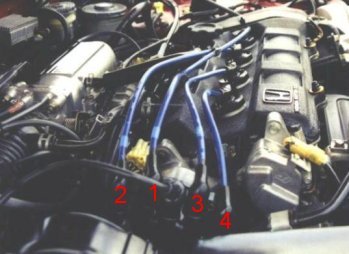
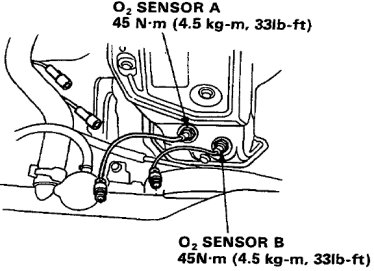
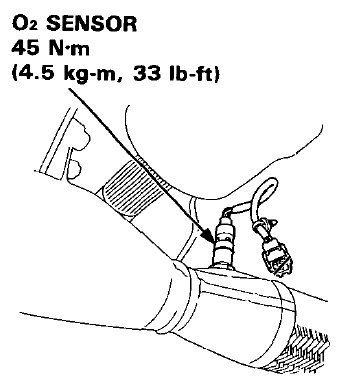
Ok, if you have a 88-89 with a b20a(x) you have 2 o2 sensors located on the front of the exhaust manifold toward the bottom. If you have a 90-91 with a B21a(x) engine you have one O2 sensor located on the down pipe before the catalytic converter. Keep in mind that the 2.0SI 90-91 models came with b20a5's.
2 Sensor setup:
1 Sensor setup:
B20a(x) / 2 sensor setup:
Write down which sensor goes to which plug so you don't get the new ones plugged in wrong. When you take the sensor(s) out you want the engine to be warmed up fully and exhaust manifold hot, it will make it easier getting them out, also wear some gloves if you can so you don't burn yourself. Now you have 2 options, they make special O2 sensor sockets to take the sensors out, however I've always been able to get on them with a regular wrench so use whatever works best for you.
B21a(x) / 1 sensor setup:
To get this one out you need to jack up the car and set it on jack stands. (Never get under a car only held up with a jack!)
The sensor will be located before the flex pipe, just take it out like with the 2 sensor setup.
When putting the new sensor(s) in it would be a good idea to put some anti-seize (available at auto stores) on the thread because these things can be a bitch to get out and it will just make it easier if you ever need to remove them again. You can just tighten them good by hand or if you have a torque wrench with proper socket torque them to 33 ft-lbs.
You can get new sensors a auto parts stores or online from www.oxygensensors.com (They have sensor sockets also)
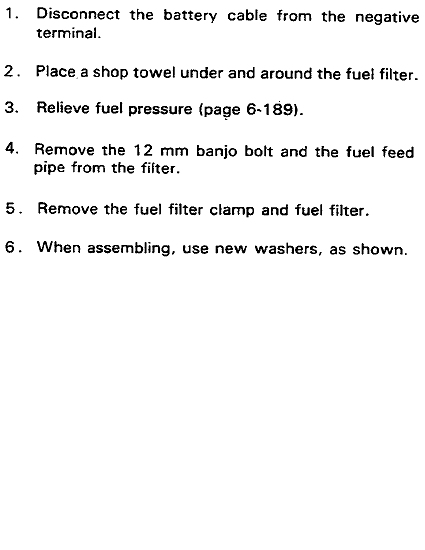
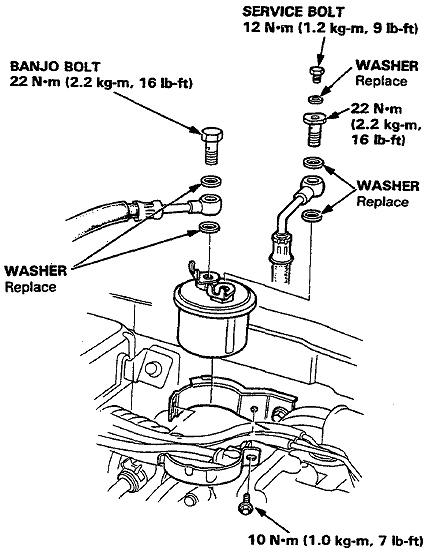
Fuel Filter:
Another overlooked item, supposed to be replaced every 2 years or 24,000 miles. Wear safety glasses! These fuel lines may be under pressure.
Alright so you've given your car a pretty good tune-up, but what else can you do?
Well for starters turn the car on, pop the hood and listen. If you hear fairly loud ticking noises coming from under the valve cover then I would suggest checking out Danos valve adjustment article HERE
Got a check engine light on in your cluster? Find out more HERE
I wrote an article about re-greasing old shifters and cables to bring back some smoothness in the shifter. You can find that HERE
Also shifter related: How to "tighten" up the feel of the shifter HERE
I would also recommend taking a look at the common problem section of this site and see if any of those articles can help you.
Happy luding!